How to Make Natural, Non-Toxic Crayons with Lindsey Marie Page
Posted by Natural Earth Paint & Lindsey Marie Page on Jul 26th 2022
This natural, non-toxic crayon recipe featuring our Earth & Mineral Pigments comes from lindsey marie page, focused on nature-based learning through the seasons!
"I wanted to come up with various projects that could be made using the same ingredients, so that if anyone wanted to invest in these materials, there would be multiple things they could make with them. My husband and I both have a background working with various types of waxes, so I started to experiment with ones that we had on hand. After a lot of testing, i’m beyond happy with the final product, and they’re also super easy to make! I came up with a simple recipe using equal amounts of 4 ingredients, so that you can make as little or as much as you want without having to do all the math!"
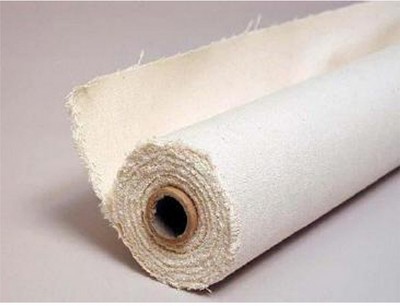
Here’s a list of what you’ll need to make your own non-toxic crayons, and if you want them to turn out exactly like mine, I would recommend using all of the same brands.
- pure organic beeswax pastilles
- organic carnauba wax
- organic cocoa butter wafers
- supernatural soy flakes
- pouring pitcher
- stainless steel pouring pitcher (Ideally one for each color)
- glass jars (optional, and are only needed if you aren’t using the stainless steel pouring pitchers to mix your colors.)
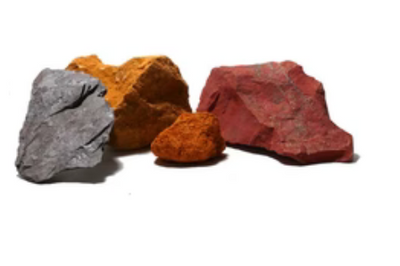
- earth + mineral pigments
- craft sticks
- silicone mold (I used around 2 for 1lb of the melted mixture.)
- kitchen scale
- hand mitt
- large pot
- steaming or roasting rack
- water
- cork trivets (optional, but what I use to set hot pitchers and jars on.)
- gathre mat (optional, but a great way to protect the surface that you’re working on.)
- mask
Something to note: Once you use these supplies for making crayons, they should only be used for making things like this in the future. You should no longer use any of these supplies for cooking or anything food related.

Ok, now let’s get started making the crayons!
- Prepare your workspace for easy clean up: The first thing I always like to do is set up my work space. I personally love using gathre mats as they always protect the surface that i’m working on, and if i drip any melted wax during this process, it comes off easily. So in this case, lay out your gathre mat, molds, scale, jars, and other materials.
- Boil your water: Put your steaming/roasting rack in the bottom of your pot and begin to boil your water. I prefer to start boiling my water in a kettle and then pour it around my pitcher to a little over an inch above the bottom. You can also measure the amount of water before and boil it directly in your pot.
- Pull out your scale and measure out your ingredients: While your water is heating up, put your pouring pitcher on the scale and begin to measure out your ingredients. You will be using equal amounts (1:1:1:1) of the beeswax pastilles, carnauba wax, cocoa butter, and soy flakes, so the amount is up to you. I usually measure out 4 oz of each, until my scale reaches 1lb.
- Place your pitcher in your pot: Once those 4 ingredients are measured, place your pitcher in the pot on top of your rack so that it isn’t touching the bottom.
- Lower your heat & stir until your ingredients are fully melted: Lower your heat to around medium to keep it at a slow boil and stir it occasionally until your wax is fully melted. You do not want to over heat it.
- Measure out your Earth & Mineral Pigments: While your wax is melting, you can measure out your pigment/s. I like to make 4 colors at a time to make my measurements easy, but you can do as little or as much as you want. Each color can require a different amount of pigment, so this is something that you can play with over time. I tend to use around 1-2 teaspoons for every 4 ounces of wax. So in this case, if you were making 1lb of melted wax and making 4 different colors, you would need 4 glass jars or 4 stainless steel pouring pitchers. Measure out your pigments into each jar and have fun with it! You don’t have to use just one pigment per jar; I love mixing them and making my own colors. This is also the part that I recommend wearing a mask because you are working with fine powders, and it’s always good to be safe and protect your lungs. After you’ve measured out all your pigments, add a craft stick to each one so that they’re ready to stir.
- Separate your wax and mix in your pigments: Once your wax is fully melted, it’s time to split it between your colors. I like to place a cork trivet on my scale and then set one jar on at a time and pour in the melted wax until it reaches around 4 oz. Once the first jar is poured, I like to give it a good stir and then set it aside.
- Reheat your wax and pour into molds: Once all of my colors are poured and stirred, I like to grab one jar at a time and set it back on the rack in the pot. Then I continue to stir it until it’s fully mixed and melted again. If you’re working with only the stainless steel pouring pitchers, then your first color is ready to pour! If you’re working with glass jars, then this is the time to pour your first color into your stainless steel pouring pitcher. These will be hot, so this is where your hand mitt comes in “handy”. I really like using the hand mitt that I linked above because it’s small and doesn't cover your entire hand, making it much easier to maintain a steady pour. Once you have your first color ready to go, slowly and steadily pour it into your molds, making sure not to pour too high and causing splashing. You’ll want to pour it from just above each cavity, and try not to overflow them. Continue filling cavities until you have run out of that color.
- Repeat for each color: If you’re making more than one color, then repeat step 8 until you’re finished.
- Let your crayons cool and harden: Let your crayons sit until they’re fully hardened and be sure not to remove them too quickly because the centers could still be soft. Usually by the time i’m done cleaning everything up they’re ready to remove.
I hope your little ones love using these crayons- they really do glide so well! I know the process sounds a little complicated because I try to add in as many little details as I can, but they really are so easy to make! If you want to watch a short clip of me making the ones used in this picture, check out this reel. I think it helps show how easy it really is!"
Photos by Bri Viglianco
Recipe by lindsey marie page
Interested in more recipes featuring Natural Earth Paint products? Visit our Recipes page!
Follow us on Instagram, Facebook, and Pinterest for more natural inspiration.